Part 1: Introduction to the Electronic Workbench – The Heart of Innovation
Level 1: What is an Electronic Workbench?
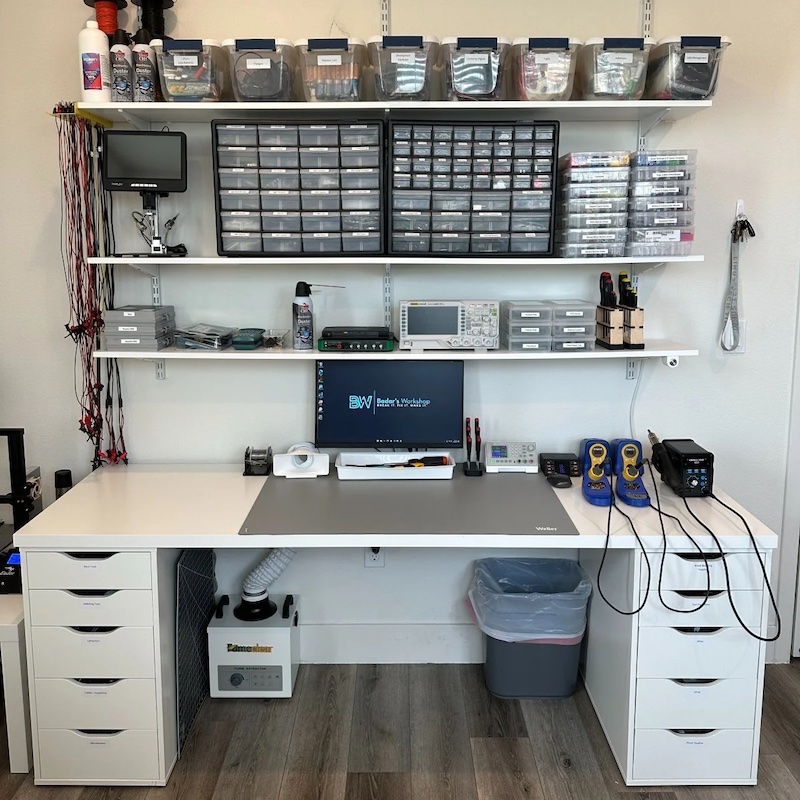
An electronic workbench serves as the central hub for all electronics-related activities, from prototyping and testing circuits to repairing devices and developing new designs. It’s more than just a physical space—it’s a carefully curated environment equipped with tools, materials, and organization systems that enable creativity and precision.
- The Role of the Workbench in Electronics:
For hobbyists, engineers, and professionals alike, the workbench is where ideas come to life. Whether you’re assembling a simple LED circuit or debugging a complex microcontroller project, the right setup can significantly enhance efficiency and accuracy. - Why Invest in a Well-Designed Workbench?
A thoughtfully designed electronic workbench not only improves workflow but also ensures safety and durability. Proper ergonomics, storage solutions, and tool accessibility are key factors in creating a productive workspace.
Level 2: Key Components of an Effective Workbench
Understanding the essential elements of an electronic workbench helps users create a functional and inspiring space tailored to their needs.
- Surface Material and Stability:
The workbench surface should be sturdy, heat-resistant, and non-conductive to prevent damage during soldering or electrical testing. Materials like wood, laminate, or ESD-safe surfaces are popular choices. - Power Supply and Lighting:
Reliable power outlets and adequate lighting are crucial for any workbench. Consider installing surge protectors, adjustable task lights, and even USB charging ports for convenience.

Part 2: Essential Tools for Your Electronic Workbench – Equipping Yourself for Success
Level 1: Must-Have Tools for Every Workbench
Building a versatile toolkit is foundational to setting up an effective electronic workbench. These tools cater to a wide range of tasks, from basic repairs to advanced projects.
- Soldering Equipment:
A quality soldering iron, along with accessories like desoldering pumps, wick, and flux, forms the backbone of most electronics projects. Look for adjustable temperature irons for greater versatility. - Multimeters and Test Equipment:
Digital multimeters (DMMs) are indispensable for measuring voltage, current, and resistance. Oscilloscopes, logic analyzers, and signal generators may also be added for more specialized applications.
Level 2: Specialty Tools for Advanced Projects
As your skills grow, so too will your need for specialized tools that expand your capabilities.
- Programmers and Debuggers:
For embedded systems development, programmers like Arduino IDE-compatible boards or dedicated debuggers (e.g., JTAG interfaces) allow you to upload code and troubleshoot hardware issues efficiently. - 3D Printers and CNC Machines:
For those interested in custom enclosures or mechanical components, integrating 3D printers or small CNC machines into your setup opens up endless possibilities for fabrication.
Part 3: Organizing Your Workbench – Maximizing Efficiency and Minimizing Clutter
Level 1: Creating an Organized Workspace
A clutter-free workbench enhances focus and productivity by keeping tools and materials within easy reach while minimizing distractions.
- Storage Solutions:
Use drawers, bins, and pegboards to store tools, wires, resistors, capacitors, and other components. Label everything clearly to save time searching for specific items. - Cable Management Systems:
Tangled cables can quickly become a nuisance. Implement cable ties, clips, or retractable reels to keep cords organized and prevent accidents.
Level 2: Ergonomic Design for Comfort and Safety
Designing your workbench with ergonomics in mind reduces strain and promotes long-term comfort during extended sessions.
- Adjustable Height and Seating:
Consider using an adjustable-height table paired with a supportive chair to maintain proper posture. Standing desks are another option for alternating between sitting and standing positions. - Anti-Fatigue Mats:
If you spend hours on your feet, anti-fatigue mats provide cushioning and support, reducing discomfort and improving circulation.
Part 4: Practical Tips for Maintaining Your Workbench – Longevity and Performance
Level 1: Cleaning and Maintenance Routines
Regular upkeep ensures your workbench remains safe, efficient, and ready for action at all times.
- Cleaning After Use:
Wipe down surfaces after each session to remove dust, debris, and flux residue. Regular cleaning prevents buildup that could interfere with sensitive electronics. - Tool Calibration and Inspection:
Periodically check and calibrate tools like multimeters and oscilloscopes to ensure accurate readings. Replace worn-out tips on soldering irons and inspect cables for fraying.
Level 2: Upgrading and Expanding Your Setup
As technology evolves and your projects become more ambitious, upgrading your workbench becomes necessary to stay ahead.
- Adding Modular Features:
Incorporate modular shelving units, foldable extensions, or rolling carts to adapt your workspace to changing needs. This flexibility allows you to scale your setup without starting from scratch. - Investing in Smart Technology:
Smart power strips, IoT-enabled sensors, and voice-controlled assistants can streamline operations and add a modern touch to your workbench.
Part 5: Behind the Scenes – How to Build Your Own Custom Workbench
Level 1: Planning Your Workbench Layout
Creating a custom workbench begins with careful planning to ensure it meets your unique requirements and preferences.
- Assessing Space Constraints:
Measure your available space and decide whether you need a fixed or mobile workbench. Wall-mounted options conserve floor space, while freestanding benches offer greater flexibility. - Defining Functional Zones:
Divide your workbench into distinct zones for different activities, such as soldering, testing, and assembly. This zoning approach streamlines workflows and minimizes disruptions.
Level 2: Construction Techniques and Materials
Once the design is finalized, selecting the right materials and construction methods ensures durability and functionality.
- Choosing Durable Materials:
Opt for materials that resist wear and tear, such as plywood for structural integrity and laminates for smooth, easy-to-clean surfaces. Avoid conductive metals unless they’re specifically treated for ESD safety. - DIY vs. Pre-Built Options:
While building your own workbench offers complete customization, pre-built models from manufacturers like IKEA or Harbor Freight provide cost-effective alternatives for beginners.
Accessories That Enhance Your Workbench Experience
Level 1: Essential Accessories for Everyday Use
Certain accessories can significantly improve the functionality and usability of your electronic workbench.
- Helping Hands and Magnifiers:
These handy tools hold components steady and magnify small details, making intricate soldering and assembly tasks much easier. - ESD-Safe Mats and Wrist Straps:
Protect sensitive electronics from static discharge by using ESD-safe mats and grounding straps. These precautions are especially important when handling delicate ICs or semiconductors.
Level 2: Creative Enhancements
Take your workbench experience to the next level with these creative additions.
- Modular Shelving Units:
Install adjustable shelves above or beside your workbench to store frequently used tools and components. Magnetic strips can also be mounted for holding screwdrivers and pliers. - Fume Extraction Systems:
For soldering-heavy projects, invest in a fume extractor to remove harmful vapors and keep your workspace clean and healthy.
By understanding what makes an electronic workbench exceptional, exploring diverse tools and organizational strategies, leveraging expert tips, and embracing future innovations, you can fully unlock its potential. Whether you’re seeking functionality, comfort, or inspiration, a well-designed workbench offers endless possibilities—one project at a time!
Conclusion: Elevating Your Craft with a Thoughtfully Designed Workbench
Level 1: Celebrating the Impact of a Well-Designed Workbench
An electronic workbench is far more than a collection of tools and furniture—it’s the foundation upon which countless innovations are built. By investing time and effort into its design, you empower yourself to achieve higher levels of craftsmanship and creativity.
- A Universal Solution:
Whether you’re a beginner tinkering with breadboards or a seasoned engineer designing cutting-edge prototypes, a well-equipped workbench adapts to your skill level and aspirations. Its versatility makes it invaluable across industries and disciplines. - Inspiring Future Innovations:
As electronics continue to shape our world, the role of the workbench will only grow in importance. Emerging technologies like AI-driven diagnostics, augmented reality overlays, and automated assembly systems promise exciting advancements for future setups.
Level 2: Looking Ahead – Trends in Workbench Evolution
With ongoing advancements in materials science, connectivity, and automation, the future of electronic workbenches holds immense potential for growth and innovation.
- Integration of Augmented Reality (AR):
Imagine AR glasses projecting schematics directly onto your workspace, guiding you step-by-step through complex builds. Such innovations would revolutionize how we approach hands-on projects. - Sustainability and Eco-Friendly Practices:
Future workbenches may incorporate renewable energy sources, recyclable materials, and energy-efficient equipment to align with global sustainability goals. These practices reduce environmental impact while maintaining high performance.